
Set up your Inventoryy account with our self-serve onboarding process.
Warehouses
From the onboarding page, click "Set Up" in the Warehouses section to create a warehouse
To add a warehouse, click the "New Warehouse" button

Enter the following information:
- Warehouse Name
- Phone Number
- Street
- City
- State
- Zip Code
- Country
Once this information is entered, click the "Save" button to add the warehouse

Sales Channels
From the onboarding page, click "Configure" in the Sales Channels section to connect your sales channels
Amazon
Select “Amazon” integration under Marketplaces.

Choose the Amazon Marketplace that you are logging into and then click "Add"
Log in to your Amazon account by entering your login credentials on the Amazon Seller Central login page.

Once logged in, you will be prompted to approve access for Inventoryy to connect to your Amazon account. Agree to the Application access terms and it will redirect you back and the Amazon will have a green "Connected" Status underneath.

Adding Additional Amazon FBM Accounts
In order to add additional Amazon FBM accounts to Inventoryy, do the following:
1. Click on the Amazon FBM icon on the Integrations page
2. Click on "Add New"
3. Log into the other Amazon FBM account
4. Grant permissions for Inventoryy to access your additional Amazon FBM account

eBay

Log in to your eBay account by entering your login credentials on the eBay login page. Once logged in, you will be prompted to approve access for Inventoryy to connect to your eBay account. 

Adding Additional eBay Accounts
In order to add additional eBay accounts to Inventoryy, do the following:
1. Click on the eBay icon on the Integrations page
2. Click on "Add New"
3. Log into the other eBay account
4. Grant permissions for Inventoryy to access your additional eBay account

Shopify

Input your Shopify Store URL then click "Add"

You'll authorize the Inventoryy app to connect to your Shopify store by clicking "Install"

Adding Additional Shopify Accounts
In order to add additional Shopify accounts to Inventoryy, do the following:
- Click on the Shopify icon on the Integrations page
- Click on "Add New"
- Log into the other Shopify account
- Grant permissions for Inventoryy to access your additional Shopify account

Walmart

Input your Walmart Client ID and Client Secret then click "Add"
.png?width=688&height=388&name=Screenshot%20(423).png)
Please allow the Walmart API up to 60 minutes to process your request
Adding Additional Walmart Accounts
In order to add additional Walmart accounts to Inventoryy, do the following:
- Click on the Walmart icon on the Integrations page
- Click on "Add New"
- Enter a new Client ID and Client Secret

Integrations
From the onboarding page, click "Configure" in the Integrations section to connect your other integrations

Banking
Plaid
Select “Add Bank Account” integration under Banking.

Press "Continue"
Enter your phone number and click "Continue" or "Continue as guest"

Select your institution
Press "Continue to login" and log in to your bank account

Confirm access to the accounts you are connecting and click "Continue" and your bank account will be connected
Inventory
Phonecheck
Select “Phonecheck” integration under Payments.

Enter your Phonecheck Username and API Key, then click "Add"
Usernames are assigned by your Phonecheck account manager. If you do not know your username, please contact Phonecheck directly.
Access your Phonecheck API Key here: https://cloudportal.phonecheck.com/cloud/setting/ApiKey


Shipping
UPS
Select “UPS” integration under Shipping.
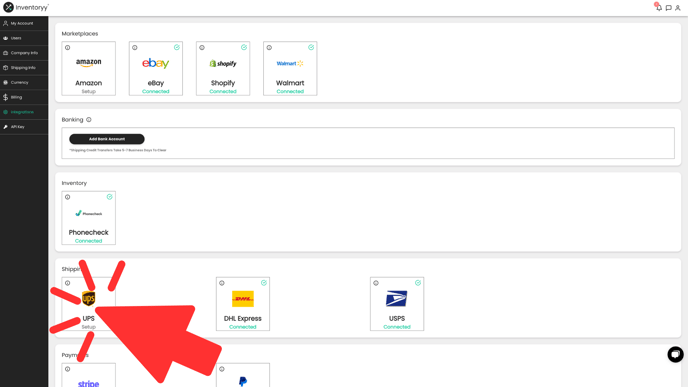
It will ask you to log into your UPS account by entering your login credentials on the UPS login page. Once logged in, you will be prompted to approve access for Inventoryy to connect to your UPS account and will be taken back to Inventoryy.
Verify your UPS Account Number and click on "Done".

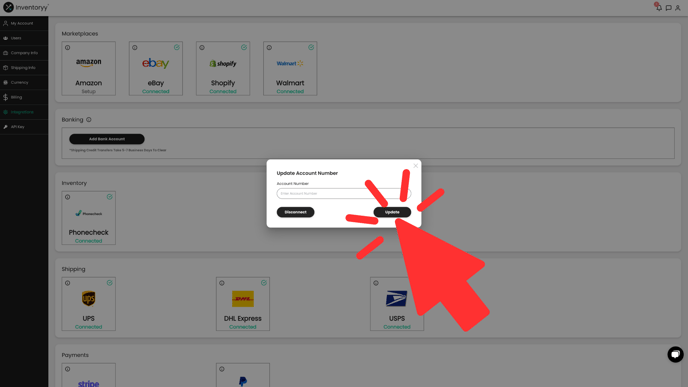
Change UPS Accounts
In order to change or update your UPS account to Inventoryy, do the following:
Click on the UPS icon on the Integrations page
Enter in the new UPS account number
Click on "Update"
Grant permissions for Inventoryy to access the new UPS account
Payments
Stripe
Select “Stripe” integration under Payments.
Enter the email address for your Stripe account then click "Submit"

Enter your password and click "Submit"

Add public details for customers then click "Continue"

Review your information then click "Agree and Submit"

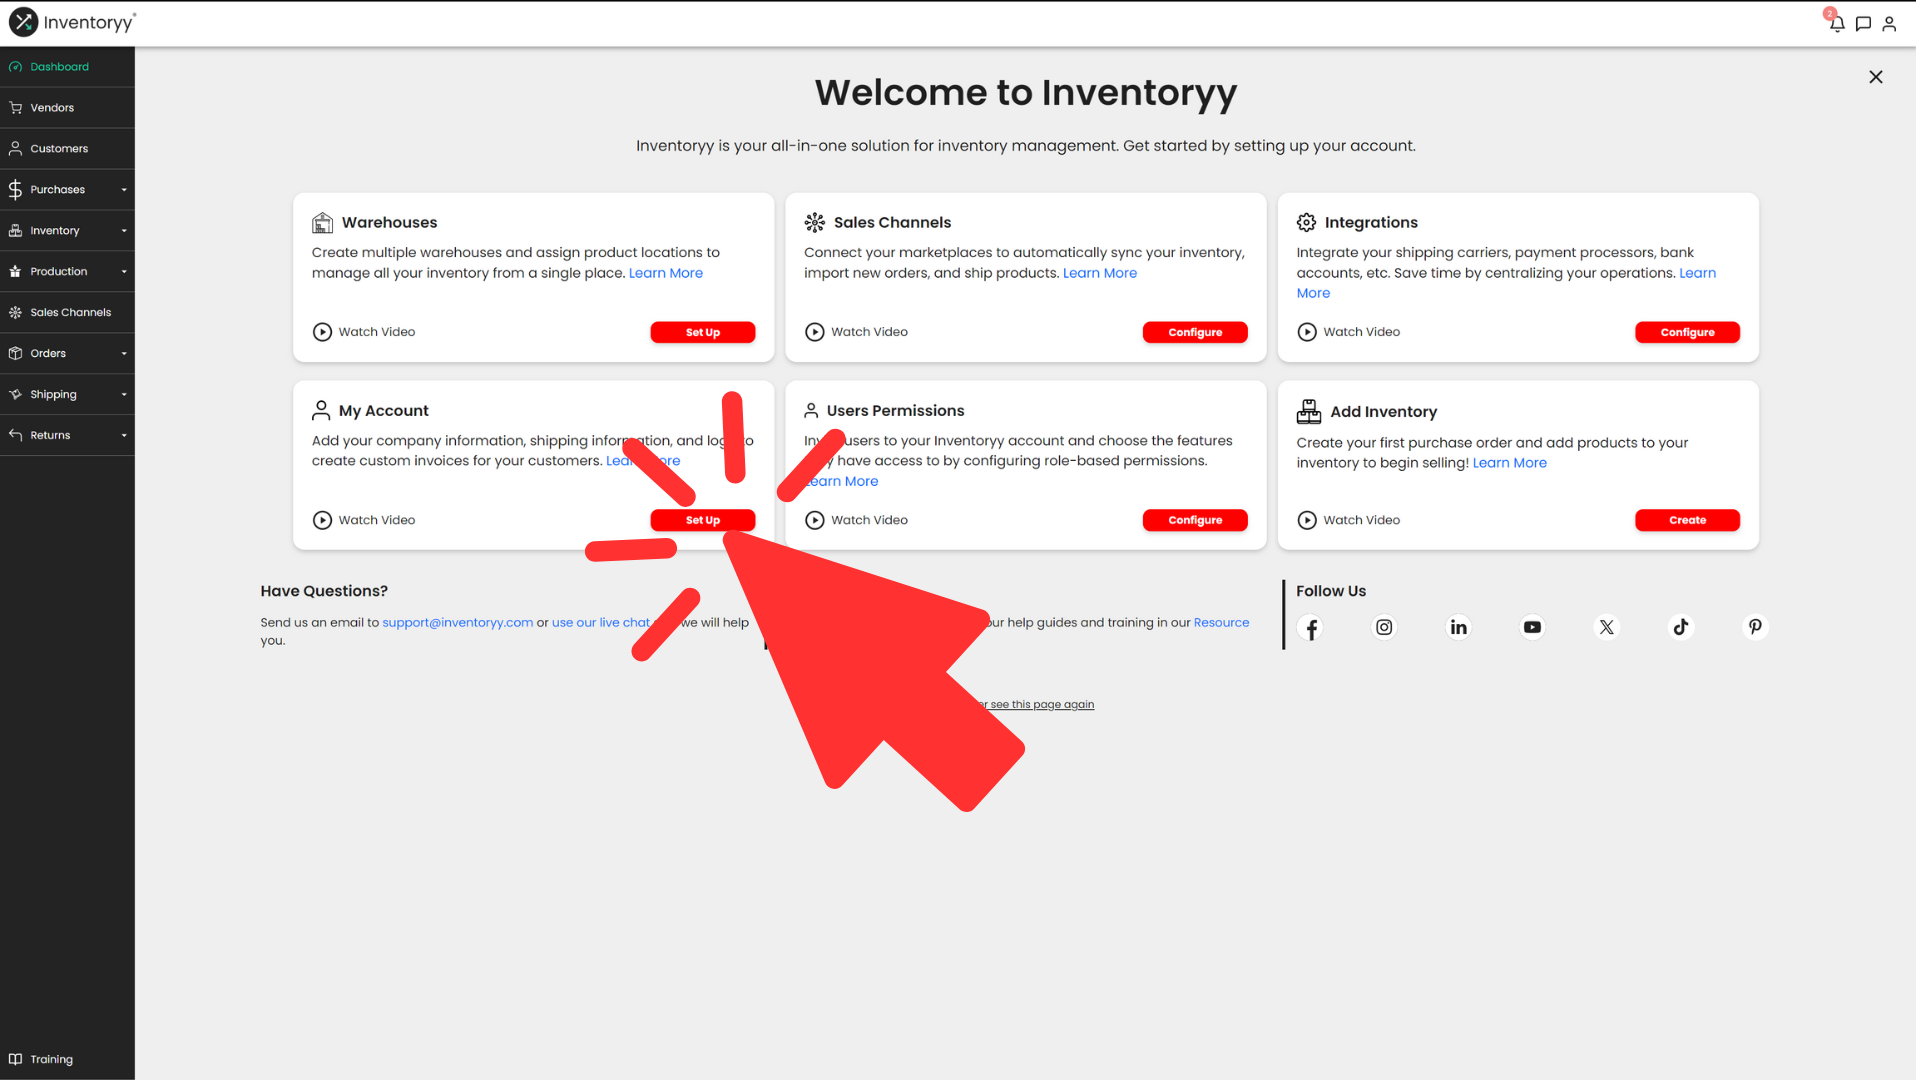
My Account
From the onboarding page, click "Set Up" in the My Account section
My Account

Enter the following information and click "Save" to set up your account:
- Username
- Name
- Timezone
- Email Address
- Phone Number
- Password
Company Information

Enter the following information to set up your company:
- Logo
- Company Name
- Email Address
- Address
- Phone Number
- Website
Shipping Information
 Enter the following information to set up your shipping details:
- Name
- Company Name
- Phone Number
- Shipping Address
- Return Address
Currency

Select the currency you would like to see displayed throughout Inventoryy, then click "Save"
Billing

Membership
Manage your subscription based on your monthly order volume.
All subscriptions include access to all features and unlimited products, users, and integrations.
Membership Plans:
Basic
- $99 / month | $948 / annual
- 1000 orders per month
Plus
- $199 / month | $1908 / annual
- 2500 orders per month
Pro
- $299 / month | $2868 / annual
- 5000 orders per month
Enterprise
- $499 / month | $4788 / annual
- 10,000 + 1¢* orders per month
*10,000 orders per month, then $0.01 per additional order. 1 order = 1 unit sold.
**Enterprise accounts are charged at the end of each monthly billing cycle for overage orders.
Get 2 months free when you upgrade to an annual membership.
Payment Methods
Add, remove, or update credit cards at any time on your Inventoryy account.
Select “Add Payment Method” to add a credit card on Inventoryy.
Use your credit card for the following:
- Subscription payments
- Buy and print shipping labels
- Add insurance to shipments
Bank Account Information
 Save an additional 3.5% on all shipping labels and insurance by securely connecting your bank account to Inventoryy with Plaid.
Select “Add Bank Account” and follow the prompts to connect your account.
*Shipping credit transfers take 5-7 business days to clear for bank accounts.
Shipping Credit Balance

Make sure you always have shipping funds available to purchase discounted shipping labels and insurance directly through Inventoryy.
Add Funds To Account
Add funds to your shipping balance via bank transfer or credit card by entering the amount and clicking “Add Funds”.
Set Up Automatic Funding
-png-1.png?width=1920&height=1080&name=Untitled%20design%20(16)-png-1.png)
Set up automatic funding for your Inventoryy shipping account by the following:
- Select Payment Method - Choose your credit card or bank account
- Add Minimum Balance - Set the minimum balance your account must reach before charging a new payment.
- Set Recurring Charge - Set the amount you want to be charged when your account reaches the minimum balance.
- Turn On/Off - Set to automatically add shipping funds. Your account will be charged when the minimum balance is met.
*Shipping credit transfers take 5-7 business days to clear for bank accounts.
User Permissions
From the onboarding page, click "Configure" in the User Permissions section to add all of your users
To add a user, enter their First Name, Last Name, Email Address, select their role (Admin or Member)
Admin = Can update permissions of other users
Member = Cannot update permissions of other users
-png-1.png?width=688&height=387&name=Untitled%20design%20(96)-png-1.png)
Next, set permissions for the Inventory section.
This section is for each specific page in Inventoryy.
Permissions include:
Full Access: Can view, edit and delete
Read & Write Only: Can view and edit, but not delete
Read Only: Can view, but not edit or delete
No Access: Cannot view, edit or delete
-png-1.png?width=688&height=387&name=Untitled%20design%20(97)-png-1.png)
Set permissions for the My Account section.
This is for each specific page of the My Account section in Inventoryy.
-png-2.png?width=688&height=387&name=Untitled%20design%20(98)-png-2.png)
Finally, set permissions for the Financials section.
This is for each metric shown throughout Inventoryy.
For example, if you do not want certain employees to see your profits, set Profit to "No Access"
-png-1.png?width=688&height=387&name=Untitled%20design%20(99)-png-1.png)
Once these sections are complete, click Add User.
-png-2.png?width=688&height=387&name=Untitled%20design%20(100)-png-2.png)
To edit a user, select the user by clicking the box on the left side of their name, then click Edit User

Edit any of the user information then click Cancel Edit User or Update User

To delete a user, select the user by clicking the box on the left side of their name, then click Delete User

Add Inventory
From the onboarding page, click "Create" in the Add Inventory section to create your first purchase order
Enter the following information to create a new Purchase Order:
- Date
- Vendor
- Email Address
- Phone Number
- Mailing Address
- Order ID (auto-generated but can be edited)
Add products to purchase orders by uploading a file, bulk upload, manual input, or import via Phonecheck.
Upload A File
- Select “Download Template” to download the product import Excel file.
- Complete all the fields in the Excel file, then select “Upload” to import multiple products.


Bulk Upload
- Bulk import multiple products by SKU or Unique Identifier
- Scan barcodes or input SKU numbers to quickly add products to a purchase order

Import via Phonecheck
Select "Import from Phonecheck" under Create Purchase
Import by Invoice Number by selecting the date range and invoice number
Import by ESN/IMEI by entering each number in the ESN field
Select “Import” to add a product to the purchase order
Manually input the following to add products to a purchase order:
- Warehouse
- SKU
- Brand
- Model
- Condition
- Notes
- Unique Identifier
- Quantity
- Cost Per Unit
Bulk Apply
You can use the Bulk Apply features for faster Purchase Order creation
To apply a Warehouse to all of the products in your Purchase Order first check the boxes to the left of the products
Next, select a Warehouse and click "Apply All"
If you have a Cost set for your products on the Products page, you can bulk apply Cost to your products in the Purchase Order as well
Once again, check the boxes to the left of the products, then click "Apply Cost"
Enter the following information for shipping details:
- Courier
- Shipping Method
- Shipping Cost
- Tracking Number

Enter any details about the purchase order under “Notes”
Select “Print Labels” to print unique barcode labels for each product listed


Select “Download” to download or print a PDF of the purchase order

.png?width=688&height=388&name=Screenshot%20(420).png)
Select “Save Draft” if the purchase order has not been received

Select “Add To Inventory” if the purchase order has been received.
Never see this page again
Once you have finished getting started, click "Never see this page again" 