
Accurately track incoming return status. Process product returns into inventory to be resold.
Create Return Page
Start URL: inventoryy.com/inventory-management/returns/create-return
From the dashboard, navigate on the sidebar to Returns > Create Return

Create Return
To create a return, start by entering the following information on the Create Return page:
- Date
- Customer (name)
- Order ID
- Email Address
- Phone Number
- Return ID (auto-generated but can be edited)
- Billing Address (Street, City, State, Zip code, Country/Region)
- Mailing Address (Street, City, State, Zip code, Country/Region)
-png.png)
By selecting a Customer from the dropdown, Email Address, Phone Number, Billing Address and Mailing Address will be auto-filled
-png.png)
Bulk Upload
Bulk Upload section is used to products in the return by SKU or Unique Identifier
-png.png)
Warehouse
Warehouse column represents the warehouse where the products in the return are being held
-png.png)
SKU
SKU column displays the SKUs for each product in the return
- By entering a SKU: Brand, Model and Unique Identifier will be auto-filled
Brand
Brand column displays the Brand for each product in the return
Model
Model column displays the Model for each product in the return
Unique Identifier
Unique Identifier column displays the Unique Identifier for each product in the return such as UPC, IMEI, ESN, etc.
- This is a way to universally identify the product
Quantity
Quantity column displays the quantity of each product in the return
Sold Condition
Sold Condition column represents the condition that each product was in when it was sold to the customer (New, Used, etc.)
Sold Price Per Unit
Sold Price Per Unit column displays the price that each product was sold for in the return
Sales Channel
Sales Channel column displays the sales channel in which each product was originally sold
Refund Amount Per Unit
Refund Amount Per Unit column displays the dollar amount that was refunded for each product
Notes
Notes column displays any notes for each product in the refund, such as the reason for return
New Condition
New Condition column represents which condition each product was in when it was returned (ex. Damaged)
- If the condition is the same as when it was sold, enter that condition in the New Condition column
New SKU
New SKU column represents the new SKU for each product in the return
- Since SKUs are representative of the Brand, Model, Condition and Unique Identifier, if any of these have changed, the product will need to be renamed a new SKU
- If none of Brand, Model, Condition or Unique Identifier has changed, the original SKU will be auto-filled
Courier
Courier column displays the shipping courier that the return was shipped through (ex. USPS, FedEx, etc.)
-png.png)
Shipping Method
Shipping Method column shows the method in which the return was shipped (ex. First Class, Priority Mail, etc.)
Shipping Cost
Shipping Cost column displays your cost of return shipping
Tracking Number
Tracking Number column displays the tracking number for the return
Notes
Use the Notes section to add any additional notes for the return
-png-1.png)
Units
The Units section is on the bottom middle part of the Create Return page
- This displays the total number of units in the return
-png.png)
Total
The Total section displays the total amount refunded for the return plus any additional shipping cost
- This will be auto-populated when “Refund Amount Per Unit” and “Shipping Cost” are entered
-png.png)
Print Labels
By clicking the “Print Labels” button, this will generate both 2x1in and 4x2in labels for each product in the return
- Select which size you would like, then click the red “Print” button to print the labels
-png.png)
-png.png)
Download
By clicking the “Download” button, the return will display as a PDF
- You will have the option to either print (black button) or download the return as a PDF (red button)
-png.png)
-png.png)
Save Draft
By clicking the “Save Draft” button, you will be asked, “Are you sure you want to save this return as a draft?” Click “Yes” to confirm or “No” to cancel
- Once a return is saved as a draft, it will display on the “Returns” page as an “Open” status
-png.png)
-png.png)
Add To Inventory
By clicking the “Add To Inventory” button, you will be asked, “Are you sure you want to update this return to your inventory?” Click “Yes” to confirm or “No” to cancel
- Once the return has been added to your inventory, it will display on the “Returns” page as a “Closed” status
- The products will also be available under the “Inventory” —> “Stock Count” page
-png.png)
Returns Page
Start URL: inventoryy.com/inventory-management/returns
From the dashboard, navigate on the sidebar to Returns < Returns
-png.png)
Download
To download one or more returns, first, select an order by checking the box on the far right column of the orders page
- Next, click the “Download” button and the return(s) will be downloaded as a PDF
-png.png)
Create Return
By clicking the “Create Return” button, you will be redirected to the “Create Return” page
-png.png)
Select Status
By clicking the “Select Status” dropdown, you can select which status(es) you would like to view
Status filters include:
- Select All
- Open
- Closed
-png.png)
Date
Date column represents the date that each return was created
-png.png)
Warehouse
Warehouse column displays the warehouse that the products in each return are being returned to
Sales Channel
Sales Channel column displays the sales channel that each return was sold through
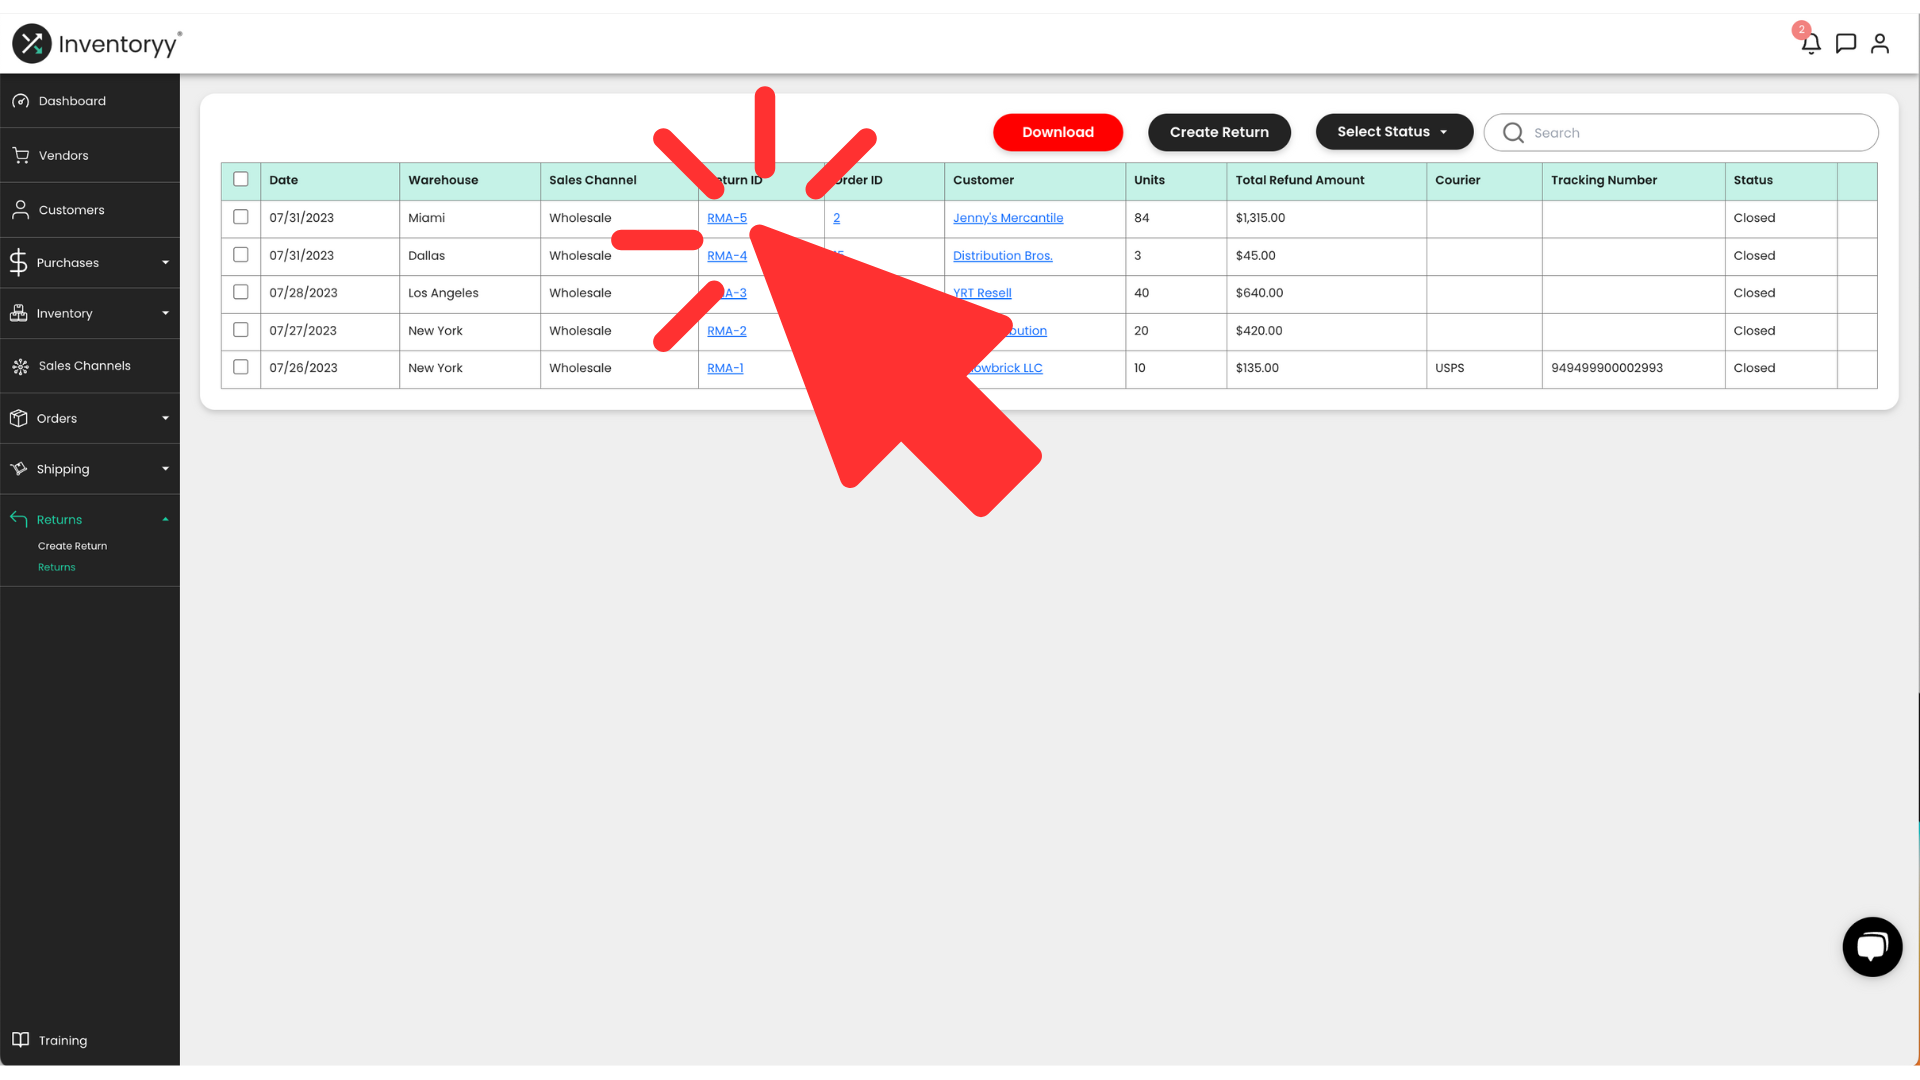
Return ID
Return ID column displays the ID assigned to each return
- By clicking the hyperlink of the Return ID, you will be redirected to the “Create Return” page which shows the details of the return
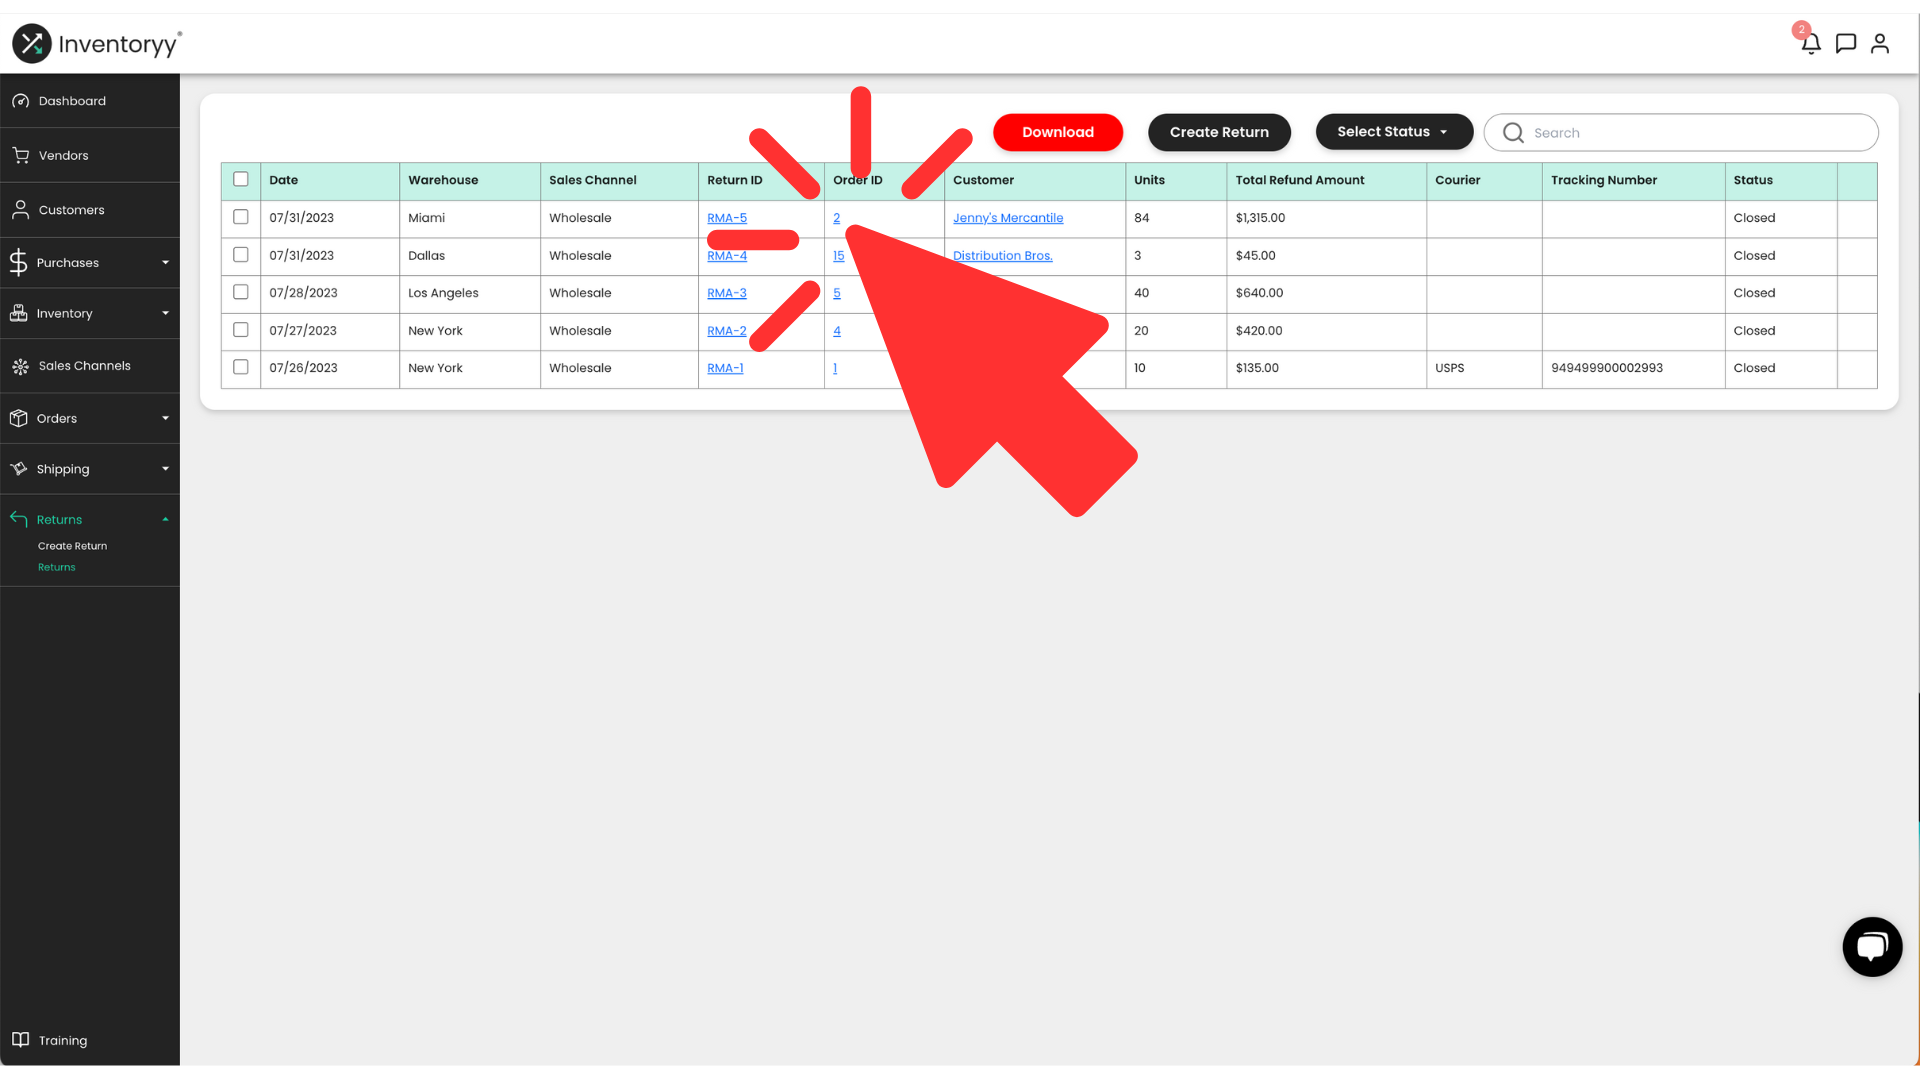
Order ID
Order ID column displays the ID of the order that was returned
- By clicking the hyperlink of the Order ID, you will be redirected to the “Create Order” page which shows the details of the order
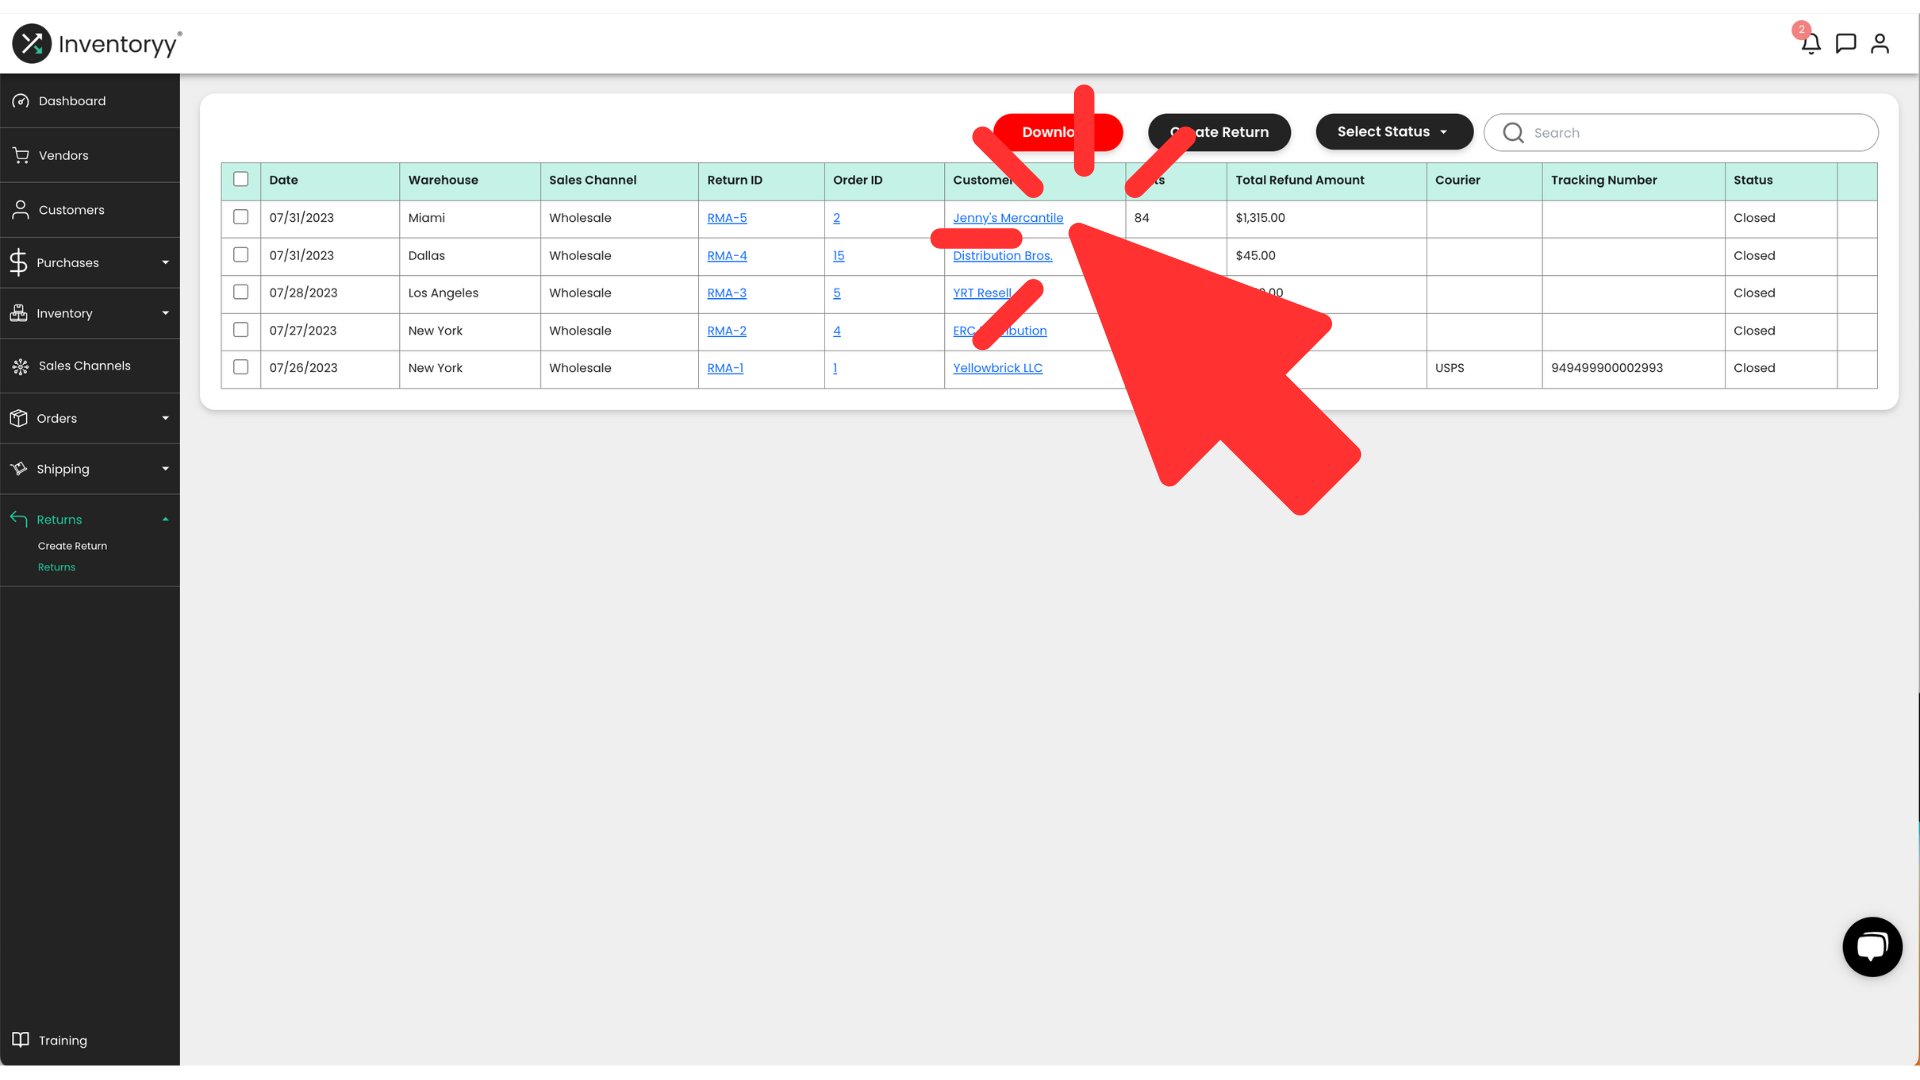
Customer
Customer column displays the customer who purchased the order
- By clicking the hyperlink of the Order ID, you will be redirected to the “Customers” page
Units
Units column displays the total number of units in each return
Total Refund Amount
Total Refund Amount column displays the total dollar amount that was refunded in each return
Courier
Courier column displays the shipping courier that was used to ship each return (ex. USPS, FedEx, etc.)
Tracking Number
Tracking Number column displays the tracking number for each return
- By clicking the hyperlink, the tracking updates will display
Status
Status column displays the status of each shipment (ex. Ready to Ship, Shipped, etc.)
Delete
To delete a return, click on the (trash can) button on the far right side of each order
-png.png)